Dying for Dye... A DIY
Calling all creative types! If you've ever secretly dreamed of repurposing your WDW into pillows or changing the color, now is your chance. During our largest pre-order EVER, before we changed our return policies, many customers ordered more than they needed and returned a few. Others returned for minor lace discrepancies or flaws. This left us with quite a few pre-order items just hanging around our warehouse. Lucky you! We don't have the time to look over each item with a fine tooth comb, so we are offloading them all at a significant (more than half off!) discount. Some will be close to perfect. Others will have minor flaws. All sales will be final. These dresses are still some of my all time favorites, so feel free to keep them exactly as they are- or express your creativity and design a one-of-a-kind. We sought the advice of several WDW moms who have already experimented with color (to great effect!), and below are some of the tips they shared (along with our own less-than-scientific instructions).
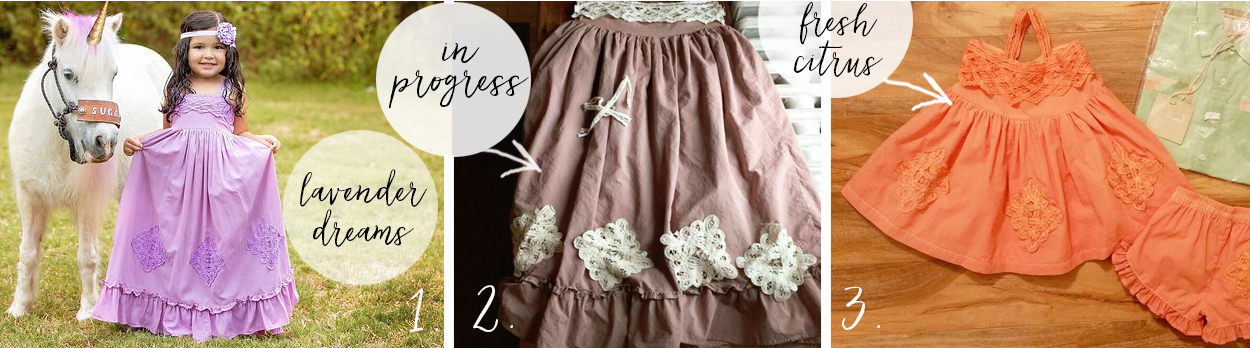
- 1. It was my very first dye job. It was originally a mint maxi. My first step was to use RIT Color Remover. Then I washed with bleach. It turned out a very light yellow but it was light enough to dye. I used half a box of RIT purple color. I only used half because I wanted a lavender color, and I also only stirred it for about 30 minutes instead of 60 mins. I do think it's better to use RIT liquid instead of powder. After I dyed it, I also had straps reinforced. To be honest it was not a perfect dye job since it was my first, but it still photographed beautifully. We had unicorn pictures in it and loved how it turned out. I also bought two more maxi dresses in mint and pink because they are just beautiful in original color and so timeless and perfect for summer wear. Our photographer was Sarah Mendoza with Seem Photography. ~Perla Navarro
- 2. This is the best alone picture that I have, taken before I reattached the lace pieces. I took a seem ripper and carefully detached the lace and seams that held the lace in. Then I rinsed the dress so it was wet and filled my sink with very hot water with one package RIT color remover. The remover did not actually take any color out but I do think it helped prep the fabric to take the dye. Next I rinsed the color remover, and washed on delicate (but did not dry) to make sure it was clean before placing again in the kitchen sink with water and RIT liquid dye in the color "Camel". I mixed with a wooden spoon so all the areas of the dress were equally covered and let it soak for about a half an hour. Then I rinsed and again put in the washing machine on delicate. I would not do it in a sink if I had a porcelain sink. To reattach the lace I found the closest matching thread and sewed by hand. Someone more experienced with a machine could probably get the job done quicker but by hand worked just fine! ~Carolyn Phillips
- 3. The tunic set I had was the light pink. I think the liquid dye I used was "Tangerine" by RIT. I followed the instructions in their website because I was scared to try! I figured if I royally messed up then there's always bleach or color remover! ~Amy Van Marel
-
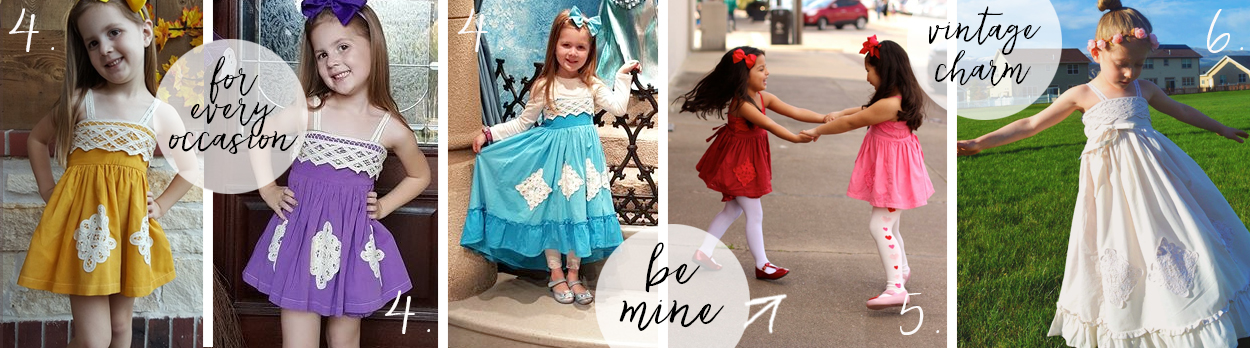
4. We have dyed quite a few! The dying process is as follows: Lace trim is removed and bleached if desired. The original color on the dress is removed with a color remover or bleach and then re-dyed with a either a liquid dye or powder dye. Sometimes colors can be mixed to get desired color... I found out the hard way do not use a stainless steel and bleach....lol they don't mix! It makes the dress splotchy. After the original color has been removed, the dress needs to be hand washed and rinsed VERY well. Once that is done, its time to re-dye it. Sometimes we had to mix colors to get the color we wanted-- especially the darker colors. The dress needs to be soaked in hot water before dying and sometimes multiple trips to the dye are necessary. Once the desired color is reached, the dress will need to be rinsed until water runs clear, then hand wash and rinse again. Last step is using a color setter, (necessary for dark colors especially). We just followed the box directions for that. Once that step is done, it's time to dry....do not wring to dry it will leave marks. The best way to get all the water out is to put in between towels and press out the water, then either hang or lay flat to dry. Once dry, the lace is reattached. :) Hope this is helpful! I wish I had the skills to be able to do this but my mom is the one with all that talent! ~Jessica Robertson (dying by Kristine Erickson)
-
5. I used the stove top method so I would recommend to stir the dress consistently and to definitely watch the clock! I would also recommend to not to be nervous and to just enjoy the process! It'll turn out great regardless! ~Laura Miranda
-
6. First know your fabric type you are planning on dyeing such as cotton, nylon, etc. This will matter when you are following the product directions that are used during this dyeing process.
-
1 Box of Rit ® color remover 2oz
-
1 Bottle of Rit ® liquid dye color camel/ camello 8oz
-
1 extra large pot
-
Sink
-
Test fabric in pure white. (Use the exact fabric type you are planning on dyeing)
-
¼ cup of salt. (I know the dye bottle said more but I was barely using any dye as it is)
-
Tongs or two large wooden spoons
-
Rubber gloves
Directions for removing color are on box of Rit ® color remover. If you don't have access, here is the basic idea: Fill your pot full of water and add to heat. Add color remover packet. Allow the pot to come to a simmer. Add your dress to the simmering pot. Using tongs pick dress up and move it around in the hot water (this is to make sure all the color has been removed from every part of the dress evenly). Once your dress is PURE white, remove it from the hot water and bring to sink. It only took the pink maxi a few minutes to fully lift the color. Rinse the dress with cold water and check to make sure the dress has lifted its color evenly. If not, add to the color remover again until the color has lifted. Wash your dress in the sink using a small amount of laundry detergent. Rinse thoroughly with hot water. I let my dress sit for a few days to air dry.
Sink Dyeing process
Add very HOT water to your sink filling it ¾ ways up Approximately 3 Gallons. Add your Liquid Dye to the sink. (The more dye added will result in the darker color). I added about ¼ cup and had to dilute the water 3-4 time to achieve a tea colored water. ¼ cup of salt added to the water. Use your test fabric to achieve your desire color. *Only dipping parts in and avoiding getting the whole piece wet so you can see the actual color on a clean fabric piece.
Dilute water/color as needed. I would dilute by draining the sink to ½ full then adding more hot water. Once desired color is achieved rinse fabric in cold water until water runs clear. Wash item in sink or washing machine with small amount of detergent the let air dry. Iron. Now it’s done!
Hope you enjoy the process and love your results. ~Katelynne Parks
-
Now for my own "Rose Ombre" process... I am pretty sure I couldn't duplicate the results if I tried, but maybe you can...

First, I gently removed two of the lace appliques which took too long for my limited patience. The second and third went a lot faster :/ resulting in a few small holes in the skirt. No biggie- the yards of fabric should hide it, right? Next, I filled a galvanized steel tub with hot water and a hefty sprinkling of salt. I added the entire contents of RIT Fuchsia liquid dye to the water. To "muddy" the color a little, I added a bit of RIT Tan (I did not measure, but it was less than 1/4 of the bottle). I placed the hem of the dry dress into the dye bath and carefully submerged the bottom half of the dress, leaving the highest point in the dye for less than 30 seconds and slowly pulling it out. I took time removing the dress from the tub, pulling it out in 1 or 2 inch increments every minute or so (which allowed the lower portions to absorb more dye). I left the hem ruffle submerged for about 7 minutes.
I wasn't happy with the stark line created at the top of my ombre skirt, so (over the garage sink) I used a teeny bit of dish soap to "soften the dye" at the highest dyed point on the skirt. Here, I also wet the entire dress (even the bodice and upper skirt that were not dyed) and rinsed until water ran clear(ish). I immediately washed the dress in my washer on the normal cycle (with detergent), and removed it to discover that the non-dyed portions of the dress and the lace on the bodice had become a lovely shade of soft pink, blending it all together perfectly! I think it was a total fluke but I love the results (and more important- Jo loves it!).
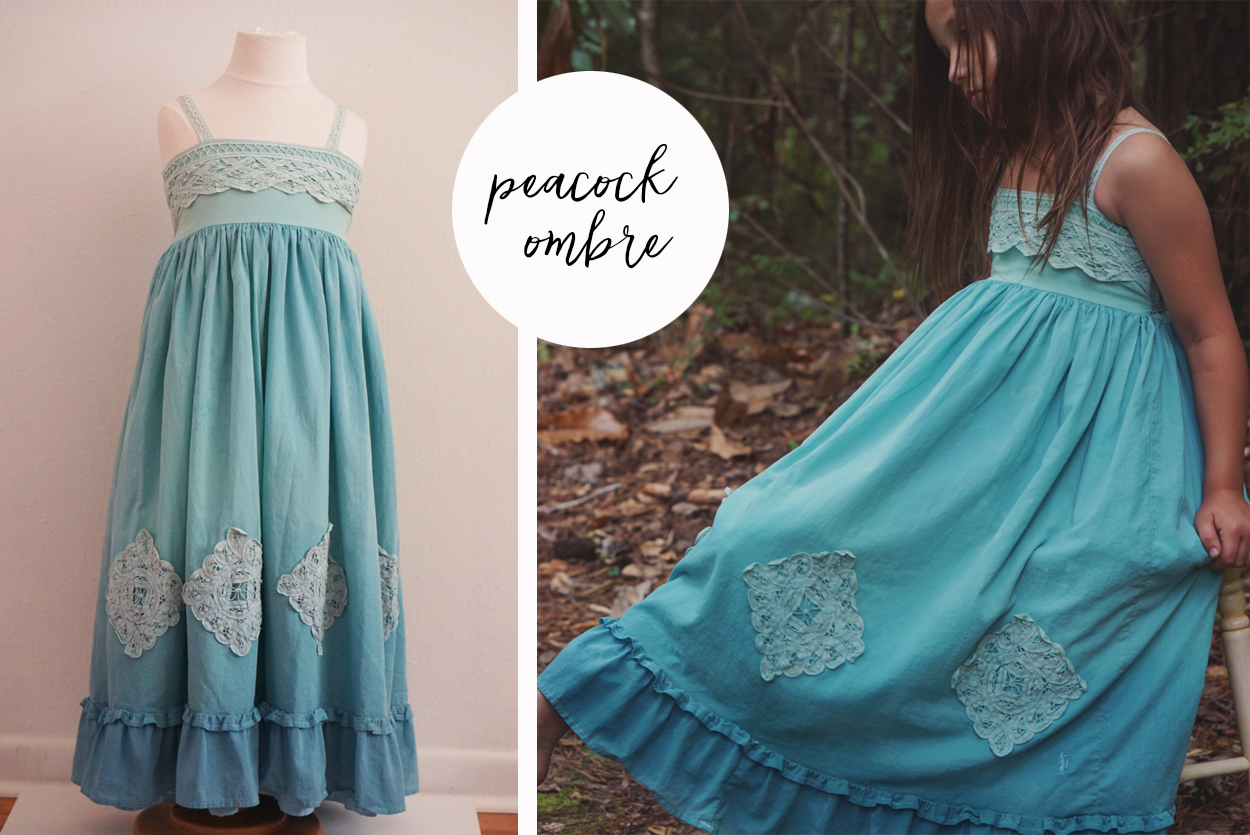
Using the green maxi, Shannon created the most beautiful peacock toned ombre effect in a process eerily similar to mine (we did not discuss beforehand!). She filled a washtub 1/3 of the way full with hot water and added 1/4 to 1/2 of a bottle of Teal Rit dye and about 2 tbsp of Evening Blue Rit dye.
She opted to keep the lace around the skirt and also added one step. After washing the dress once (following her hem dip dye), she submerged the entire wet dress back into the dye for about five minutes then washed again. This allowed the lace to pick up some faint color and softly blended the entire dress. I LOVE how it turned out!
From a design perspective, here are a few tips:
- If you choose not to remove the color first, try to select a dye that will work well with the dress color. In my case, the dress was already pink so a deeper pink was a great choice for creating a "rose" effect. I also thought about mixing pink and orange to create a pretty peach tone. Shannon used the green maxi with teal and blue dyes to create the most beautiful peacock effect.
- If you can sew, lace can be removed and re-attached if you want to keep the natural color-or you can even try dying lace a totally different color than the dress. Have fun and experiment!
Love all these colors! So when are the extras loading? Thanks for the opportunity!
what time will they be loading today?
Thank you So much for featuring my vintage ivory dress in your diy blog! -Katelynne Parks
Can I just pay Shannon to make mine the peacock ombre?? Cause I’m to scared to even try it! Lol
Love both of these thanks for the ideas!
I know!! I want her to do one of mine too…